How to Record Screen with Filmora9 Video Editor?
If you’re working from home on this special moment, you may also have the need to record your computer screen more often just like me. With the help of recording and video editing software, anyone can very easily record the screen and make a good captured video whether you have experience or not. The different tools are provided by these software which helps you to share and edit the videos all over the world.
Filmora9 is an easy to use video editor which features stunning screen recording and voiceover recording tools, which is available on windows 7, windows 8, windows8.1, windows 10 and Mac. It is a very great choice for novice users and semi-pros as compared to the sophisticated and expensive video editor to record and edit videos. If you want to record and edit the tutorial video, gameplay video or FAQ and send it to your colleagues or friends, or upload the video to YouTube, Filmora9 video editor helps you take your editor to another level.
How to screen records on Mac with Filmora9?
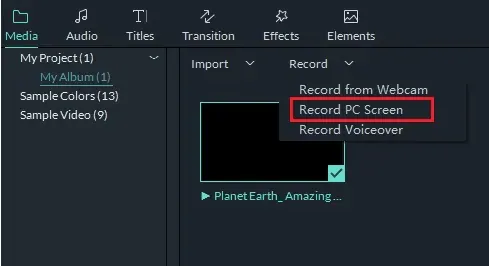
- Firstly you should launch the Filmora9 and then you have to select ‘create new project’. Click on ‘record’ and then you should choose ‘Record PC screen’ if you want to record the computer screen only.
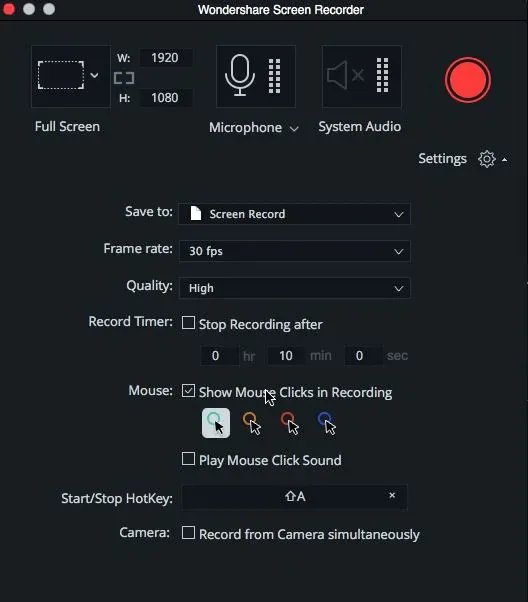
- You can also choose ‘custom’ and ‘full screen’ in the window of the screen recorder which pops up for customizing the area of screen recording. It is upon you to choose whether you want to record from ‘microphone’ or you want to record from the audio system of the computer. Either of these icons can be clicked if you want to turn off the audio tools. You can access more settings from the settings like frame rate.
- Then click on the REC button and after this, the recording will start by the program after it finishes the countdown. When the countdown gets over, the customized button must be pressed in the settings if you want to stop the recording. Then the recorded video will be placed automatically in the timeline panel.So, you can cut the unwanted frames and do some editing such as speed up the video.
How to screen records on windows with Filmora9?
- Firstly launch Filmora9, and then you have to select ‘create a new project’ and set up the project aspect ratio. To record the computer screen, go to Record tab and then select ‘record PC screen’.
- You can choose among the three types of screen recording which include Custom, Target Window, and Fullscreen. If you want to record from computer system audio or microphone, then you must click on the icons too on or off them accordingly. Then press on ‘settings’ for checking if you need anything to adjust before the recording.
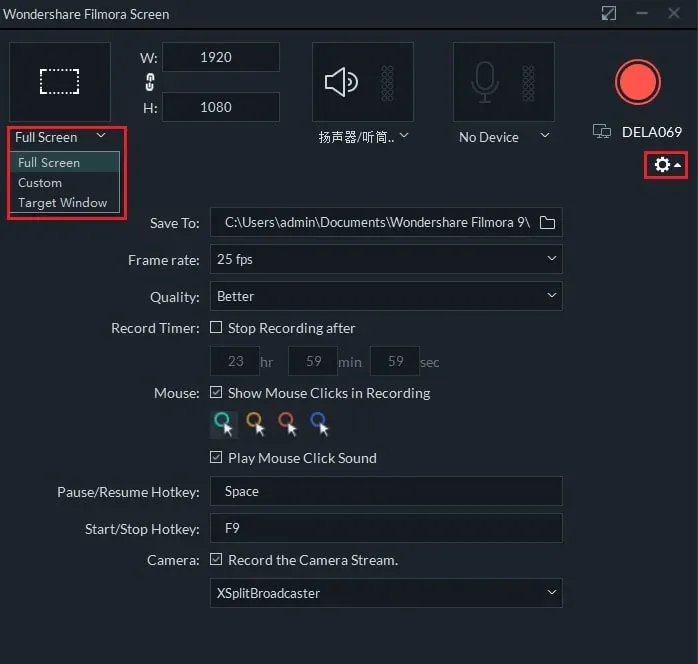
- Then you have to click on the REC button when all get ready. The countdown will begin by program and recording gets started. Either you can press F9 or in settings, you can very easily customize the hotkey start/stop to stop the recording. Then automatically the recorded media gets dropped in the library media.
Filmora9 is a video editing software that lets you manipulate the videos as you want. It is the screen and webcam recorder which lets you record as you want. After the software gets installed and launched on your computer, you have to click on ‘record’ and select the option of ‘Record PC screen’, record webcam or record voiceover based on your needs.
The screen recorder window appears on the screen after this so that the settings can be adjusted for the screencasting session. On the left side of the window of the screen recorder, you will see a rectangle icon which will help you choose the area of the screen you can record. The choice can be done by you among the target, full screen, and custom window option.
Then you have to click on the icon of microphone for selecting the mic which can be used for recording the narration. Click on the icon of speakers if you want to disable or enable the speakers of the computer at the time of the recording session. In the windows’ lower right corner, there will be an icon of settings, then you have to click on it so that you can have access to more options. On the hard drive of the computer, you have to choose the destination where you want to save the recording. Then you can set the quality of the recorded video and adjust the frame rate from the drop-down menu of ‘quality’ with the screen and webcam recorder.
If you want the clicks of the mouse to be shown then you have the mark the mouse checkbox. The maximum duration can also be set by you of the recording session after you insert the default duration of the screen recording as per your preference in the record timer box. If you want to start the new recording session, then click on the REC button and then the recording will be started by the software after the countdown of three seconds. Then on the keyboard press F9 button if you want to stop the recording. The File automatically gets opened in the video editor Filmora9 so that the editing can be done before you post online. The fast processing is done and the adjustable quality of preview will help you to be more innovative and productive. You can very easily screen records with Filmora9 on Windows and Mac.

Comments